Lesson 1: Basic Shapes
- Summary
- *
- Text version
- *
- Exercises
- *
- Download source
Try it Out
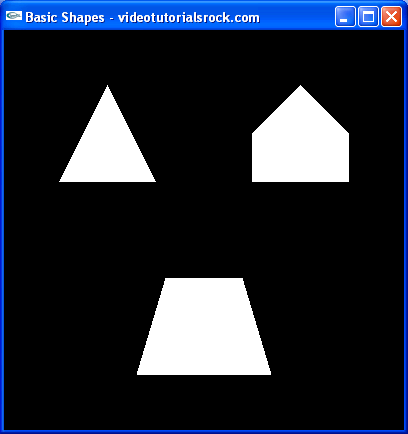
Let's take a look at our first OpenGL program. Dowload the "basic shapes" program, and compile and run it (details on how to do that can be found in "Part 0: Getting OpenGL Set Up"). Take a look at it, and hit ESC when you're done. It should look like the following image:
Overview of How the Program Works
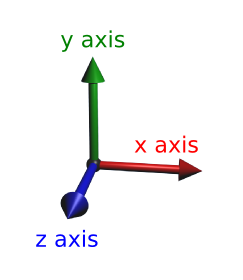
How does the program work? The basic idea is that we tell OpenGL the 3D coordinates of all of the vertices of our shapes. OpenGL uses the standard x and y axes, with the positive x direction pointing toward the right and the positive y direction pointing upward. However, in 3D we need another dimension, the z dimension. The positive z direction points out of the screen.
How does OpenGL use these 3D coordinates? It simulates the way that our eyes work. Take a look at the following picture.
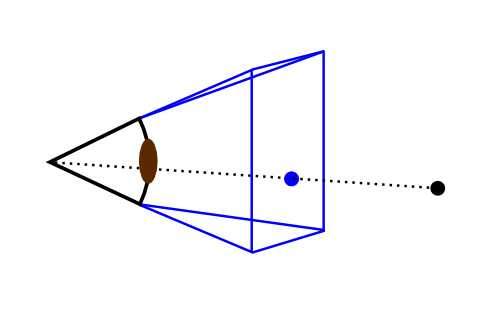
OpenGL converts all of the 3D points to pixel coordinates before it draws anything. To do this, it draws a line from each point in the scene to your eye and takes the intersection of the lines and the screen rectangle, as in the above picture. So, when OpenGL wants to draw a triangle, it converts the three vertices into pixel coordinates and draws a "2D" triangle using those coordinates.
The user's "eye" is always at the origin and looking in the negative z direction. Of course, OpenGL doesn't draw anything that is behind the "eye". (After all, it isn't the all-seeing eye of Sauron.)
How far away is the screen rectangle from your eye? Actually, it doesn't matter. No matter how far away the screen rectangle is, a given 3D point will map to the same pixel coordinates. All that matters is the angle that your eye can see.
Going Through the Source Code
All of this stuff about pixel coordinates is great and all, but as programmers, we want to see some code. Take a look at main.cpp.
The first thing you'll notice is the license indicating that the code, like all of my code on this site, is completely free. That's right, F-R-E-E. You can even use it in commercial projects.
The second thing you'll notice is that it's heavily commented, so much so that it's a bit of an eye sore. That's because this is the first lesson. Other lessons will not be so heavily commented, but they'll still have comments.
Let's go through the file and see if we can understand what it's doing.
#include <iostream>
#include <stdlib.h> //Needed for "exit" function

//Include OpenGL header files, so that we can use OpenGL
#ifdef __APPLE__
#include <OpenGL/OpenGL.h>
#include <GLUT/glut.h>
#else
#include <GL/glut.h>
#endif
First, we include our header files. Pretty standard stuff for C++. If we're using a Mac, we want our program to include GLUT/glut.h and OpenGL/OpenGL.h; otherwise, we include GL/glut.h.
using namespace std;
We'll have this line near the top of main.cpp in all of our programs. It just makes it so that we don't have to type std:: a lot; for example, so we can use cout instead of std::cout.
//Called when a key is pressed
void handleKeypress(unsigned char key, //The key that was pressed
                    int x, int y) {    //The current mouse coordinates
    switch (key) {
        case 27: //Escape key
            exit(0); //Exit the program
    }
}
This function handles any keys pressed by the user. For now, all that it does is quit the program when the user presses ESC, by calling exit. The function is passed the x and y coordinates of the mouse, but we don't need them.
//Initializes 3D rendering
void initRendering() {
    //Makes 3D drawing work when something is in front of something else
    glEnable(GL_DEPTH_TEST);
}
The initRendering function initializes our rendering parameters. For now, it doesn't do much. We'll pretty much always want to call glEnable(GL_DEPTH_TEST) when we initialize rendering. The call makes sure that an object shows up behind an object in front of it that has already been drawn, which we want to happen.
Note that glEnable, like every OpenGL function, begins with "gl".
//Called when the window is resized
void handleResize(int w, int h) {
    //Tell OpenGL how to convert from coordinates to pixel values
    glViewport(0, 0, w, h);

    glMatrixMode(GL_PROJECTION); //Switch to setting the camera perspective

    //Set the camera perspective
    glLoadIdentity(); //Reset the camera
    gluPerspective(45.0,                  //The camera angle
                   (double)w / (double)h, //The width-to-height ratio
                   1.0,                   //The near z clipping coordinate
                   200.0);                //The far z clipping coordinate
}
The handleResize function is called whenever the window is resized. w and h are the new width and height of the window. The content of handleResize will be not change much in our other projects, so you don't have to worry about it too much.
There are a couple of things to notice. When we pass 45.0 to gluPerspective, we're telling OpenGL the angle that the user's eye can see. The 1.0 indicates not to draw anything with a z coordinate of greater than -1. This is so that when something is right next to our eye, it doesn't fill up the whole screen. The 200.0 tells OpenGL not to draw anything with a z coordinate less than -200. We don't care very much about stuff that's really far away.
So, why does gluPerspective begin with "glu" instead of "gl"? That's because technically, it's a GLU (GL Utility) function. In addition to "gl" and "glu", some functions we call will begin with "glut" (GL Utility Toolkit). We won't really worry about the difference among OpenGL, GLU, and GLUT.
//Draws the 3D scene
void drawScene() {
    //Clear information from last draw
    glClear(GL_COLOR_BUFFER_BIT | GL_DEPTH_BUFFER_BIT);
The drawScene function is where the 3D drawing actually occurs. First, we call glClear to clear information from the last time we drew. In most every OpenGL program, you'll want to do this.
    glMatrixMode(GL_MODELVIEW); //Switch to the drawing perspective
    glLoadIdentity(); //Reset the drawing perspective
For now, we'll ignore this. It'll make sense after the next lesson, which covers transformations.
    glBegin(GL_QUADS); //Begin quadrilateral coordinates

    //Trapezoid
    glVertex3f(-0.7f, -1.5f, -5.0f);
    glVertex3f(0.7f, -1.5f, -5.0f);
    glVertex3f(0.4f, -0.5f, -5.0f);
    glVertex3f(-0.4f, -0.5f, -5.0f);

    glEnd(); //End quadrilateral coordinates
Here, we begin the substance of our program. This part draws the trapezoid. To draw a trapezoid, we call glBegin(GL_QUADS) to tell OpenGL that we want to start drawing quadrilaterals. Then, we specify the four 3D coordinates of the vertices of the trapezoid, in order, using calls to glVertex3f. When we call glVertex3f, we are specifying three (that's where the "3" comes from) float (that's where the "f" comes from) coordinates. Then, since we're done drawing quadrilaterals, we call glEnd(). Note that every call to glBegin must have a matching call to glEnd.
All of the "f"'s after the vertex coordinates force the compiler to treat the numbers as floats. Technically, I don't think that they're necessary, but I'm going to be using them everywhere.
    glBegin(GL_TRIANGLES); //Begin triangle coordinates

    //Pentagon
    glVertex3f(0.5f, 0.5f, -5.0f);
    glVertex3f(1.5f, 0.5f, -5.0f);
    glVertex3f(0.5f, 1.0f, -5.0f);

    glVertex3f(0.5f, 1.0f, -5.0f);
    glVertex3f(1.5f, 0.5f, -5.0f);
    glVertex3f(1.5f, 1.0f, -5.0f);

    glVertex3f(0.5f, 1.0f, -5.0f);
    glVertex3f(1.5f, 1.0f, -5.0f);
    glVertex3f(1.0f, 1.5f, -5.0f);
Now, we draw the pentagon. To draw it, we split it up into three triangles, which is pretty standard for OpenGL. We start by calling glBegin(GL_TRIANGLES) to tell OpenGL that we want to draw triangles. Then, we tell it the coordinates of the vertices of the triangles.
OpenGL automatically puts the coordinates together in groups of three. Each group of three coordinates represents one triangle.
    //Triangle
    glVertex3f(-0.5f, 0.5f, -5.0f);
    glVertex3f(-1.0f, 1.5f, -5.0f);
    glVertex3f(-1.5f, 0.5f, -5.0f);
Finally, we draw the triangle. We haven't called glEnd() to tell OpenGL that we're done drawing triangles yet, so it knows that we're still giving it triangle coordinates.
glEnd(); //End triangle coordinatesNow, we're done drawing triangles, so we call glEnd().
Note that we could have drawn the above four triangles using four calls to glBegin(GL_TRIANGLES) and four accompanying calls to glEnd(). However, this makes the program slower, and you shouldn't do it.
There are other things we can pass to glBegin in addition to GL_TRIANGLES and GL_QUADS, but triangles and quadrilaterals are the most common things to draw.
    glutSwapBuffers(); //Send the 3D scene to the screen
}
This line makes OpenGL actually move the scene to the window. We'll call it whenever we're done drawing a scene.
int main(int argc, char** argv) {
    //Initialize GLUT
    glutInit(&argc, argv);
    glutInitDisplayMode(GLUT_DOUBLE | GLUT_RGB | GLUT_DEPTH);
    glutInitWindowSize(400, 400); //Set the window size

    //Create the window
    glutCreateWindow("Basic Shapes - videotutorialsrock.com");
    initRendering(); //Initialize rendering
This is the program's main function. We start by initializing GLUT. Again, something similar will appear in all of our programs, so you don't have to worry too much about it. In the call to glutInitWindowSize, we set the window to be 400x400. When we call glutCreateWindow, we tell it what title we want for the window. Then, we call initRendering, the function that we wrote to initialize OpenGL rendering.
    //Set handler functions for drawing, keypresses, and window resizes
    glutDisplayFunc(drawScene);
    glutKeyboardFunc(handleKeypress);
    glutReshapeFunc(handleResize);
Now, we point GLUT to the functions that we wrote to handle keypresses and drawing and resizing the window. One important thing to note: we're not allowed to draw anything except inside the drawScene function that we explicitly give to GLUT, or inside functions that drawScene calls (or functions that they call, etc.).
    glutMainLoop(); //Start the main loop.  glutMainLoop doesn't return.
    return 0; //This line is never reached
}
Next, we call glutMainLoop, which tells GLUT to do its thing. This is, we tell GLUT to capture key and mouse input, to draw the scene when it has to by calling our drawScene function, and to do some other stuff.
glutMainLoop, like a defective boomerang, never returns. GLUT just takes care of the rest of our program's execution. After the call, we have return 0 so that the compiler doesn't complain about the main function not returning anything, but the program will never get to that line.
And that's how our first OpenGL program works. You may want to try the exercises to get more familiar with what you just learned.
Next is "Lesson 2: Transformations and Timers".
- Summary
- *
- Text version
- *
- Exercises
- *
- Download source