Lesson 4: Lighting
- Summary
- *
- Text version
- *
- Exercises
- *
- Download source
Lighting in OpenGL
One way we can make our scenes look cooler is by adding light to them. In this lesson, we're going to scrap the scene from our previous lessons and make a new one. We'll make a box-shaped object, with the top and bottom removed.
Look at the source code. The first new thing is the call to glEnable(GL_LIGHTING) in initRendering. This enables lighting. Note that we can call glDisable(GL_LIGHTING) if we ever want to turn it back off. After that, we call glEnable(GL_LIGHT0) and glEnable(GL_LIGHT1) to enable two light sources, numbered 0 and 1. (You can disable the individual light sources by calling glDisable(GL_LIGHT0) and glDisable(GL_LIGHT1).) We have more than two lights at our disposal if we need them, using GL_LIGHT2, GL_LIGHT3, etc. There are guaranteed to be at least eight possible lights. Then, we call glEnable(GL_NORMALIZE). We'll get to what that does later in this lesson.
Now, go to the drawScene function.
    //Add ambient light
    GLfloat ambientColor[] = {0.2f, 0.2f, 0.2f, 1.0f}; //Color(0.2, 0.2, 0.2)
    glLightModelfv(GL_LIGHT_MODEL_AMBIENT, ambientColor);
First, we add some ambient light, which shines the same amount on every face in our scene. Ambient light is sort of like light that's shining everywhere. In the real world, there's no such thing, but in computer graphics, it's really hard to simulate light sources so well that no surface is completely unlit, so we use ambient lighting to simplify our life.
To add ambient light, we call glLightModelfv with GL_LIGHT_MODEL_AMBIENT as the first argument and an array of four GLfloats for the second argument. The compiler will automatically convert floats to GLfloats, as above.
The first three floats represent the RGB intensity of the light. We want to add white ambient light that isn't very intense, so we use red, green, and blue components of intensity 0.2. Note that the values don't exactly represent a color; they represent an intensity of light. So you could have (2, 2, 2) as the ambient light's intensity, even though this isn't a color. An ambient light intensity of (1, 1, 1) without any other light sources would look the same as in the last lesson, when we didn't have any lighting. The fourth float we just put as 1.
    //Add positioned light
    GLfloat lightColor0[] = {0.5f, 0.5f, 0.5f, 1.0f}; //Color (0.5, 0.5, 0.5)
    GLfloat lightPos0[] = {4.0f, 0.0f, 8.0f, 1.0f}; //Positioned at (4, 0, 8)
    glLightfv(GL_LIGHT0, GL_DIFFUSE, lightColor0);
    glLightfv(GL_LIGHT0, GL_POSITION, lightPos0);
Here, we've added a light source. We call glLightfv(GL_LIGHT0, GL_DIFFUSE, lightColor0) to set the color / intensity of the light. We want it to be somewhat intense, so we make the intensity (0.5, 0.5, 0.5). Again, the fourth element in our array is 1. We want to position it at (4, 0, 8) relative to the current transformation, so we call glLightfv(GL_LIGHT0, GL_POSITION, lightPos0) with the array {4, 0, 8, 1}. The first three elements of the array are the position, and the last element is just 1 again.
    //Add directed light
    GLfloat lightColor1[] = {0.5f, 0.2f, 0.2f, 1.0f}; //Color (0.5, 0.2, 0.2)
    //Coming from the direction (-1, 0.5, 0.5)
    GLfloat lightPos1[] = {-1.0f, 0.5f, 0.5f, 0.0f};
    glLightfv(GL_LIGHT1, GL_DIFFUSE, lightColor1);
    glLightfv(GL_LIGHT1, GL_POSITION, lightPos1);
Now, we set up our second light source. We make it red, with an intensity of (0.5, 0.2, 0.2). Instead of giving it a fixed position, we want to make it directional, so that it shines the same amount across our whole scene in a fixed direction. To do that, we need to use 0 as the last element in lightPos1. When we do that, instead of the first three elements' representing the light's position, they represent the direction from which the light is shining, relative to the current transformation state.
Note that glLightfv cannot be called inside a glBegin-glEnd block. A good rule of thumb is that if something doesn't have to be allowed in a glBegin-glEnd block, it isn't allowed.
Here's the next part of drawScene, with all of the commented out lines removed.
    glRotatef(_angle, 0.0f, 1.0f, 0.0f);
    glColor3f(1.0f, 1.0f, 0.0f);
    glBegin(GL_QUADS);

    //Front
    glNormal3f(0.0f, 0.0f, 1.0f);
    glVertex3f(-1.5f, -1.0f, 1.5f);
    glVertex3f(1.5f, -1.0f, 1.5f);
    glVertex3f(1.5f, 1.0f, 1.5f);
    glVertex3f(-1.5f, 1.0f, 1.5f);

    //Right
    glNormal3f(1.0f, 0.0f, 0.0f);
    glVertex3f(1.5f, -1.0f, -1.5f);
    glVertex3f(1.5f, 1.0f, -1.5f);
    glVertex3f(1.5f, 1.0f, 1.5f);
    glVertex3f(1.5f, -1.0f, 1.5f);

    //Back
    glNormal3f(0.0f, 0.0f, -1.0f);
    glVertex3f(-1.5f, -1.0f, -1.5f);
    glVertex3f(-1.5f, 1.0f, -1.5f);
    glVertex3f(1.5f, 1.0f, -1.5f);
    glVertex3f(1.5f, -1.0f, -1.5f);

    //Left
    glNormal3f(-1.0f, 0.0f, 0.0f);
    glVertex3f(-1.5f, -1.0f, -1.5f);
    glVertex3f(-1.5f, -1.0f, 1.5f);
    glVertex3f(-1.5f, 1.0f, 1.5f);
    glVertex3f(-1.5f, 1.0f, -1.5f);

    glEnd();
We put in special function calls telling OpenGL the "normals" of the different shapes in our scene. A face's normal is a vector that is perpendicular to the face. OpenGL needs to know the normals to figure out at what angle a light shines on a face. If a light shines directly on a face, the face is brighter than if the light shines at an angle. The reason OpenGL doesn't figure out the normals itself is that it would be slower than figuring them out in advance, and it doesn't let us do smooth shading, as we will later in this lesson.
As an example, the first face we draw is parallel to the x-y plane. It is perpendicular to the z-axis, so our normal is (0, 0, 1). We tell OpenGL this by calling glNormal3f(0.0f, 0.0f, 1.0f) right before we specify the coordinates of the face. It is important that the normal points "outward", because if a light is shining in the same direction a shape is facing, then it shouldn't be lit. At any rate, that's how it is with closed surfaces; the light will hit another part of the surface before it reaches the face.
In initRendering, we had called glEnable(GL_NORMALIZE). This makes OpenGL automatically normalize our normals, so that they have a length of 1, which is the form in which OpenGL needs the normals. We could do this ourselves, but functions such as glScalef affect how we have to do it. I'll cover this in more detail in a later lesson.
Here's what our program looks like:
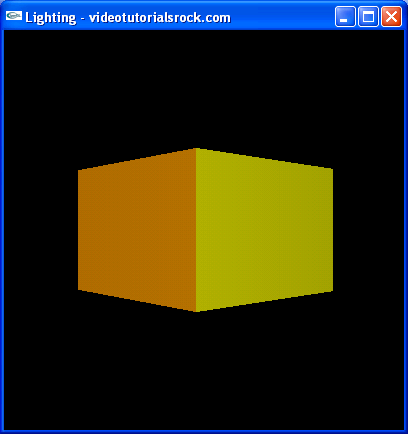
Our program has a box, with a camera that rotates around the box. Notice that we have one face that is reddish, as it receives most of the red light, one face that is bright yellow, one face that is somewhat dark yellow, and one face that is very dark yellow, which receives no light other than ambient light. The last face would be completely black if there were no ambient light.
The Power of Smooth Shading
There's one more important concept. A lot of the time, a set of polygons is meant to approximate a smooth shape, such as a sphere. In this case, we might want the faces to be shaded smoothly. Look at the example below:
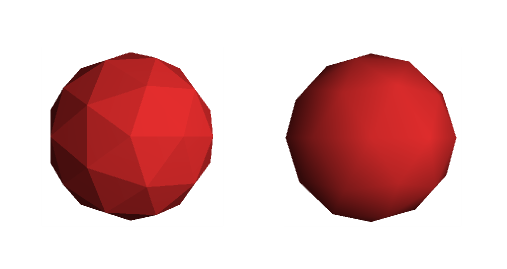
Both of the pictures have the same set of polygons. Both are meant to look like a sphere. But the one on the left doesn't use smooth shading, so it looks a lot less, well, smooth. The one on the right looks a lot more like a sphere. But it's still essentially the same shape; notice that it still has a jagged outline.
How does smooth shading work? We specify a different normal for each vertex, one that's equal to the "real" normal that a sphere would have at that point. Then, we tell OpenGL to apply smooth shading. When it draws a triangle, it takes a weighted average of the normals at the vertices to determine the normals at different points on the triangle. In this way, we can draw much better-looking shapes in a given amount of time, since smooth shading is fast on graphics cards, much faster than increasing the number of polygons. As you can see, smooth shading is a very powerful tool.
Smooth Shading in OpenGL
Now, let's say that our four walls were meant to approximate a circle. Of course, that's a pretty bad approximation (unless you're drunk or something), but we'll do what we can. First, uncomment the line glShadeModel(GL_SMOOTH) in the initRendering function, to enable smooth shading. (If we ever want to disable smooth shading, we can call glShadeModel(GL_FLAT).) Uncomment the calls to glNormal3f in drawScene and comment out the calls to glNormal3f that used to be there.
    //Front
    //glNormal3f(0.0f, 0.0f, 1.0f);
    glNormal3f(-1.0f, 0.0f, 1.0f);
    glVertex3f(-1.5f, -1.0f, 1.5f);
    glNormal3f(1.0f, 0.0f, 1.0f);
    glVertex3f(1.5f, -1.0f, 1.5f);
    glNormal3f(1.0f, 0.0f, 1.0f);
    glVertex3f(1.5f, 1.0f, 1.5f);
    glNormal3f(-1.0f, 0.0f, 1.0f);
    glVertex3f(-1.5f, 1.0f, 1.5f);

    //Right
    //glNormal3f(1.0f, 0.0f, 0.0f);
    glNormal3f(1.0f, 0.0f, -1.0f);
    glVertex3f(1.5f, -1.0f, -1.5f);
    glNormal3f(1.0f, 0.0f, -1.0f);
    glVertex3f(1.5f, 1.0f, -1.5f);
    glNormal3f(1.0f, 0.0f, 1.0f);
    glVertex3f(1.5f, 1.0f, 1.5f);
    glNormal3f(1.0f, 0.0f, 1.0f);
    glVertex3f(1.5f, -1.0f, 1.5f);

    //Back
    //glNormal3f(0.0f, 0.0f, -1.0f);
    glNormal3f(-1.0f, 0.0f, -1.0f);
    glVertex3f(-1.5f, -1.0f, -1.5f);
    glNormal3f(-1.0f, 0.0f, -1.0f);
    glVertex3f(-1.5f, 1.0f, -1.5f);
    glNormal3f(1.0f, 0.0f, -1.0f);
    glVertex3f(1.5f, 1.0f, -1.5f);
    glNormal3f(1.0f, 0.0f, -1.0f);
    glVertex3f(1.5f, -1.0f, -1.5f);

    //Left
    //glNormal3f(-1.0f, 0.0f, 0.0f);
    glNormal3f(-1.0f, 0.0f, -1.0f);
    glVertex3f(-1.5f, -1.0f, -1.5f);
    glNormal3f(-1.0f, 0.0f, 1.0f);
    glVertex3f(-1.5f, -1.0f, 1.5f);
    glNormal3f(-1.0f, 0.0f, 1.0f);
    glVertex3f(-1.5f, 1.0f, 1.5f);
    glNormal3f(-1.0f, 0.0f, -1.0f);
    glVertex3f(-1.5f, 1.0f, -1.5f);

    glEnd();
This makes the normals at each vertex equal to the "real" normals of the circle we are trying to approximate. Notice that we always call glNormal3f right before calling glVertex3f for the vertex whose normal we are indicating. Now, our program looks like this:
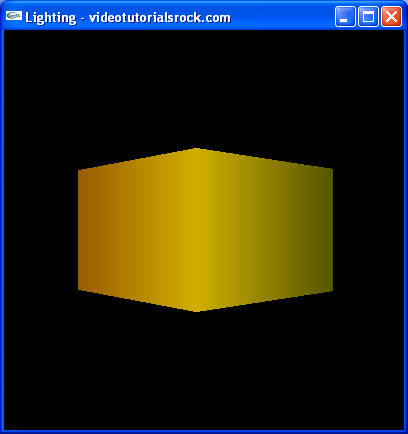
Spiffy, isn't it? That's the basic idea behind lighting in OpenGL.
Next is "Lesson 5: Textures".
- Summary
- *
- Text version
- *
- Exercises
- *
- Download source